Tuesday, December 31, 2013

My FAVORITE Apple Pie


I came across this apple pie recipe when I was looking to bake my first ever apple pie. It has been my one and only recipe I use. It's simple and I don't think I could ever do it any other way!


Ingredients

1 recipe pastry for a 9 inch double crust pie

1/2 cup unsalted butter (1 stick)

3 tablespoons all-purpose flour

1/4 cup water

1/2 cup white sugar

1/2 cup packed brown sugar

8 Granny Smith apples - peeled, cored and sliced


Directions

  1. Preheat oven to 425 degrees F (220 degrees C). 
  2. Melt the butter in a saucepan. Stir in flour to form a paste. Add water, white sugar and brown sugar, and bring to a boil. Reduce temperature and let simmer.
  3. Place the bottom crust in your pan. Fill with apples, mounded slightly. 
  4. Cover with a lattice work crust. 
  5. Gently pour the sugar and butter liquid over the crust. Pour slowly so that it does not run off.
Bake 15 minutes in the preheated oven. Reduce the temperature to 350 degrees F (175 degrees C). Continue baking for 35 to 45 minutes, until apples are soft.

Friday, October 11, 2013

THE Famous Family Meatloaf

For just about forever (or for as long as I can remember) we have used the same meatloaf recipe. It came from my sister's childhood cookbook (and yes, I am the mean little sister who swiped it and kept if for herself ;0) ). It is fantastic and super easy. It even transitioned with us when I started using ground turkey instead of ground beef.
 It is a staple recipe in this house and I just realized after all this time that it was never posted here. If I should ever lose this book, I'd be devastated since it's out of print and my favorite meatloaf recipe would be gone with it. So, without further ado, here it is!


Ingredients

1 egg
1/2 cup tomato sauce (I use ketchup most of the time)
1 1/2 cups bread crumbs or cracker crumbs (I've used both of those, broken up herbed stuffing or even oatmeal in a pinch)
1/4 cup chopped onion (I just chop up half an onion and throw it in there...maybe the whole one if it's small)
2 pounds ground beef (as stated before, I use ground turkey)
2 teaspoons salt (sometimes I use garlic salt)
1/8 teaspoon pepper

1. Preheat oven to 350 degrees.
2. Break egg into a bowl, add tomato sauce and beat until fluffy.
3. Add bread crumbs, onion, meat, salt and pepper. Mix well with hands.
4. Place mixture in a lightly greased loaf pan and pat into shape.
5. Bake 1 hour and 15 minutes or until done (sometimes mine doesn't take that long).

Thursday, October 10, 2013

Ratatouille Bake

So, I got an eggplant in my Italian themed Veggie Lover Pack with my last Bountiful Basket and have not yet figured out what to do with it...well, until now! Found this great recipe on Allrecipes.com and I'm gonna go for it! I'll take my own picture and update the post once I've made it and of course gobbled it all up! It's what's for dinner tonight!!


Ingredients

1 tablespoon olive oil
5 cloves garlic, minced
1 onion, chopped
2 cups peeled and diced eggplant
2 cups chopped zucchini
1 green bell pepper, chopped
1 (14.5 ounce) can diced tomatoes
1 tablespoon dried basil
1 tablespoon dried parsley
1/2 teaspoon salt
1/8 teaspoon black pepper
1 (8 ounce) package frozen cheese ravioli
3/4 cup shredded mozzarella cheese

Preparation

1. Preheat oven to 350 degrees F (175 degrees C); spray a 2 1/2-quart baking dish with cooking spray.
2. Heat the olive oil in a large skillet over medium heat; cook and stir the garlic, onion, and eggplant with the garlic until the vegetables have begun to soften, about 8 minutes. Stir in the zucchini, bell pepper, tomatoes, basil, parsley, salt, and black pepper; bring the mixture to a boil, stirring frequently. Reduce heat to medium-low and simmer until the vegetables are tender, about 20 minutes.
3. Cook the frozen ravioli as directed on the package; drain. Spread the cooked ravioli in a layer into the bottom of the prepared baking dish; spoon the hot vegetables over the ravioli. Sprinkle with the cheese.
4. Bake in the preheated oven until the casserole is bubbling and the cheese is melted, about 20 minutes.

Wednesday, October 9, 2013

You avoid food dyes? Yes, we do!

How do you do it?

We have had a lot of friends ask about this.  As most of our friends know, my son has ADHD. Now, it's not "scientifically proven" that food dies cause his ADHD, BUT we do know that some dyes more than other push his behaviors over the edge. So, in the spirt of ADHD Awareness Month, I'm going to post about this.


Now, I am going to be honest with you. We are not 100% clean eaters. We do "occasionally" have food dyes. By occasional, I mean, we let birthday celebrations and other special occasions go. We try to avoid the dyes we know trigger his behaviors more than others. For example: Red 40 is not our friend. So, instead of getting the slice of cake that chocolate with red and black frosting all over it, we opt for a white piece of cake with white frosting or any color other than anything that would contain red, like yellow, blue, green. It's not easy and you almost need an art degree in color theory to remember that red + blue = purple and red + yellow = orange. So, with holidays we are a little more relaxed as well. We clean out the candy at Halloween and try to stay away from all those red suckers for Valentines Day. It's not easy and we definitely have a few sad faces but we remember that we're lucky to have what we have and have the opportunity to celebrate and so far, that works for us!

So, how do we do it? We read. A lot.

So, first things first. What is an artificial food dye?

Well, basically its an ingredient added that will provide color to the food. So, here's my handy charts that display the main types of artificial dyes out there and a little bit of what they're used in, in general.


So, real quick. Let's look at "natural dyes". These are food coloring but they come from natural food sources. So, for us, they're safe!


So how do we know what dyes are in our food? Well, if it comes out of the ground, a plant or animal AND not further processed then most likely it has not been colored.

I wrote to General Mills this time last year asking about food colors and they gave me a great explanation:

Ingredient listings printed on the outside of our product packages provide consumers with an opportunity to know the ingredients used before making a buying decision. The ingredient(s) you are referring to may be present as part of “natural or artificial flavors”, “natural or artificial colors”, or “spices” included on the ingredient listing.


When "color added" is listed on a product, the color is a natural color, but may not be natural to the product ingredients.  Anytime that an artificial color is added to a product, it is required to be listed in the ingredient panel.  All FD&C colors are required by law to be listed.

So, whip out those magnifying glasses and grab a few boxes of food out of your cabinets! How about that box of Macaroni & Cheese. You'd think, hey, it's macaroni and it's cheese. Well, it is BUT read the label. It has a nice long list of what's in it.


So, our super popular Macaroni & Cheese does have two artificial food dyes. Yellow 5 & Yellow 6.

Let's look at Pop Tarts! Everyone LOVES those! Pastry and FRUIT!!


So, we're a little disappointed in the promise of real fruit. I'm sure it's in there somewhere with the Red 40 and Yellow 6. Did you also see Caramel Color? And Riboflavin?So, there are a few natural ones too.

Let's not forget our children's medications. Take a look at this widely used medication:


For medications you'll need to look at the "Inactive Ingredients". We see Red 33 and Blue 1. The regular cherry flavor is known to have Red 40.

I know I've shown all brand name items BUT it also is in your generic items too. Wether it is a brand name, generic or even if it says all natural or organic, LOOK CAREFULLY!! It's just good practice and you'll get more and more used to knowing what's there and what's not.

So this all comes down to reading your labels. It's not rocket science but it takes time and patience. It took us a little while to find the products we love that don't have the dreadful dyes but now that we're into it, it's easier. Also, once you eliminate everything for awhile you can see what really effects your children. For us, we eliminated as much as we could for a good few months. Well, we had noticed that his skin became clearer and he was in general just a bit calmer. Then Valentine's Day came around and our boy got a HUGE red sucker. We let him have it so he didn't feel left out. Well, the next day he woke up with a windburn type redness around his mouth. BINGO! So, we know for sure that the Red 40 is not our friend.  So, that is the one we stay away from the most. Somethings you just can't unless you make your own. For example, pickles. Store bought pickles contain yellow. Well, my take is 1-2 pickles on my kid's cheeseburger isn't worth my time BUT those lovely frozen drinks, we get the white cherry A LOT! It's not about making my kids feel left out but making them still be able to have treats and fun without those pesky ingredients.

So, this is my process in a nutshell. If you have ANY questions or need help, go ahead and comment below. I'd be happy to help any way that I can!


Saturday, September 28, 2013

Bountiful Baskets Haul

It's that time again!!! Bountiful Basket's Distribution Day!!! I volunteered again today. Many hands definitely make for light work. Thought you'd like a little peek at what all those baskets that get distributed look like once we've got them all filled up!


So, this is what I got this time!


Veggie Lovers Pack - Italian themed!!

1 red onion
1 garlic
3 yellow onion
1 eggplant
1 pkg mushrooms
1 yellow squash
1 zucchini
Rosemary
Basil
Thyme


This weeks basket!!

9 bananas
9 green bell peppers
1 head romain lettuce
1 pkg strawberries
1 head of living butter lettuce
1 lg white yam
2 pomegranates
1 bag regular carrots
3 oranges
2 cantaloupes (one is extra for volunteering)

As always, such a great deal. My regular basket cost was $15 and the Veggie Lovers pack was $8.50. Total with the handling fee of $1.50 (used for the truck), we got all this for $25.00. I love Bountiful Baskets!! (Can't ya tell!!) Can't wait to start cooking!!!

For more information on Bountiful Baskets they can be found at www.bountifulbaskets.org. They have sites all over the US, so check it out!! There might just be one close to you!!


Saturday, September 14, 2013

Bountiful Baskets Haul!!!

Today was the pick-up day for our Bountiful Baskets location. I volunteered to help unload the truck, sort the veggies and help with the distribution. I did help unload the truck but spent most of the time filling baggies full of green beans. I had a great time and you get a little extra item for helping out so, I got a few extra bananas since we go through TONS of them! So, here is what came in the regular $15 basket this week!


1 cauliflower
1 pkg mushrooms
1 honeydew melon
3 summer squash
6 tomatoes
1 English cucumber
1 bundle green onions
1 head of romaine lettuce
1 stalk of celery
1 pineapple
6 bananas
1 bag green beans

I also got the lunchbox pack for an additional $10.50. This is what I got:


1 3lb bag of Granny Smith apples
1 bag of green seedless grapes
1 1lb bag of baby carrots
4 bananas
4 pears
5 small yellow apples

And that's not all!! I also got this delivery's veggie lover pack. It was Mexican themed. It was $8.50. It came with:


6 tomatillos
5 limes
4 jalapeƱos
6 small avocados
1 bunch of cilantro
8 chilie peppers
2 onions
1 garlic

I am in love with Bountiful Baskets!! If you have a location in your area, it's totally worth a try! It comes every other week and as we're not huge veggie eaters,
we can make the basket last for almost the two weeks. I can't wait to try the bread the next time around. I skipped it again this time and I am kicking myself...again!

For more information on Bountiful Baskets or to find a location near you go to http://www.bountifulbaskets.org

Here's a picture of our very first basket. It just keeps getting better and better!


Friday, September 13, 2013

No, I'm not boycotting the grocery store...

But it's been a really busy week!! Here is one more SuperStar lunch that my buddy took to school today!! He has turkey and string cheese kabobs, potato salad, carrots with ranch, cutie orange with blueberries and a little treat of chocolate covered pretzels. As usual, he did not leave a single crumb!


Thursday, September 12, 2013

So what if I'm the bad mom...

that completely ran out of bread, chose to play candy crush and not go to the grocery store. Danny had a fabulous lunch anyway with a lettuce wrap that had turkey and cheese. He LOVED it and thought it was a lot of fun! Who says we need bread? Here's his SuperStar lunch today!!


Monday, September 9, 2013

Squash & Potato Gratin

This came up on the Bountiful Baskets Blog the other day and I am extremely eager to try it! It might just be what's for dinner tonight!! (I'll put my own picture up once I've made it!)


Theirs.

Mine. Not so pretty. I may have used too many veggies and
Mozzarella instead of Monterrey Jack. It was still yummy though!!


 Ingredients

  • 2 medium yellow summer squash
  • 1 pound red or russet potatoes
  • 3 tablespoons olive oil
  • 8 oz of Monterrey Jack
  • Salt and freshly ground black pepper
  • 1/4 cup milk
  • 1/3 cup freshly grated Parmesan cheese
  • 1 tsp. dried basil


Instructions

  1. Preheat oven to 400 degrees. Grease a 1 1/2 to 2 quart casserole dish.
  2. Slice the squash and potatoes very, very thin. (Mandolin slicer would be perfect)
  3. Place 1/3 of the squash and potato slices into the bottom of the pan. Layering them by alternating squash and potato but you could just spread them evenly.
  4. Season with some salt and pepper and half of the cheese.
  5. Repeat the layering with a 1/3 of the veggies, seasoning with S&P and sprinkling with cheese.
  6. Finish the gratin by layering the final veggies on top and seasoning with S&P
  7. Pour the milk over the dish then top with parmesan cheese.
  8. Bake for 30 minutes covered then uncover and finish baking for 15 minutes.


Saturday, August 17, 2013

Buttercream Frosting

Made some excellent Buttercream Frosting for some cupcakes I made for our end of summer pool party here in our neck of the woods. Loved it and I will certainly make it again when I need some rather than buy a tub. I did accidentally put too much food coloring in so it was kinda weird in that respect but other than that it's a winner for me!!


Ingredients: (yields enough for 12 cupcakes)

1 cup butter, softened
3 1/2 cups powdered sugar
1 tsp milk
1 tsp vanilla
1/8 tsp salt

Directions:

  1. In a bowl combine butter, sugar and salt. Beat till blended.
  2. Add the milk and vanilla and beat for an additional 3-5 minutes or until smooth and creamy.

Our Awesome Lunchbox - PlanetBox

SuperStar Lunch with Strawberry Jelly & Banana Sandwich

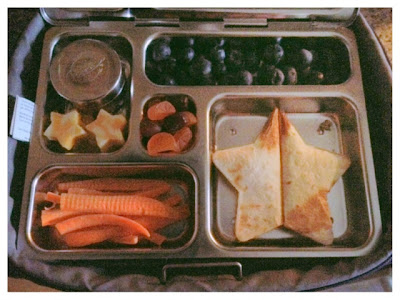
Many folks have asked about my son's lunch box. Well, I finally thought I should blog on it and will start posting some of his famous "SuperStar Lunches" as he calls them! So, first of all. What is it?? It is a full stainless steel lunch kit made by Planet Box. It has several compartments for all his food and even has some small stainless steel dishes for wet foods. We ended up purchasing his at Pottery Barn Kids since they had them with prints on the outer case when we went to just "look" since I wasn't going to invest in one until I saw it. WARNING: it is an investment. We were lucky and got his on clearance since it was a previous years print and dished out around $50 for it. I happily paid it knowing I wasn't going to be purchasing lots of little plastic baggies or have him tear up several cheap lunch bags that you get free with your backpack purchase at the beginning of each year. I only use one plastic baggie a day for his snack and that may even go to a more reusable option soon as well. It isn't microwave safe but for a cold lunch it has been PERFECT. So, Pottery Barn Kids carries this normally for $69.95. (OUCH!! I know, right!!) PlanetBox does have a website where you can purchase them as well but they have solid colored carrying cases and you can pick your own fun magnets and other accessories. The one we use is the Rover. It's the perfect size for all the variety of things this bottomless pit I have loves to eat. PlanetBox sells the Rover with the satellite containers, magnets and case for $59.95. They also sell other sizes and you can customize what you really want. They have a great Facebook page too that gives LOTS of ideas for lunches. My little guy isn't too adventurous with his lunches but he LOVES having things in shapes right now. So, I get to have a little fun in the kitchen. May take me a few extra minutes but he knows this Momma has made his lunch with love and care!

PlanetBox with Pottery Barn Kids Robot Cover

SuperStar Lunch with Cheese Quesadilla


Sunday, June 23, 2013

Crock-pot Chicken and Noodles


Ingredients

4 boneless skinless chicken breasts (I used frozen)
2 cans cream of chicken soup
1 stick of butter
2 15 oz cans chicken broth
24 oz. frozen egg noodles

Directions

Cook chicken, soup, butter, and broth in crock-pot on low for 6-7 hours.

Take chicken out and shred.

Put chicken back in; add noodles and cook on low for 2 hours. Stir a few times while cooking.

I served this over mashed potatoes, with a side of green beans.

Crock-pot Apple Oatmeal

Place 3 sliced apples, 1/2 cup brown sugar, 2 tsp cinnamon, pinch salt in the bottom of the crock pot.
Pour in 2 cups of oatmeal, 2 cups of milk and 2 cups water.
Do NOT stir.
Cook overnight for 7 - 9 (varies with different crockpots) hours on low.
Do not use quick oats
You have to use steel cut oats

Blow your MIND Tomato Basil Pasta!


Found this on Facebook. It is AMAZING!!! I added some grilled chicken on top for a little extra protein and wow! This will now be a regular dish around here!!


Blow your MIND Tomato Basil Pasta! - No Straining, just Stirring

Pasta, Tomatoes, Veggie Broth, Olive Oil, and Seasonings (details below)

Throw it all in the pot, INCLUDING the uncooked Pasta, and cook! - Bring it to a boil, then reduce to a simmer. The starch leaches out of the pasta and makes a rich, warm sauce for the noodles. The other ingredients cook right along with the pasta.


Ingredients

12 ounces pasta (I used spaghetti but will use Linguine or fettuccine next time)
1 can (15 ounces) diced tomatoes with liquid ( I used the one with mild green chile)
1 large sweet onion, cut in julienne strips
4 cloves garlic, thinly sliced
1/2 teaspoon red pepper flakes (I over did this a bit so it had a big kick but still yummy!)
2 teaspoons dried oregano leaves
2 large sprigs basil, chopped
4 1/2 cups vegetable broth (regular broth and NOT low sodium)
2 tablespoons extra virgin olive oil
Parmesan cheese for garnish

Directions

Place pasta, tomatoes, onion, garlic, basil, in a large stock pot. Pour in vegetable broth. Sprinkle on top the pepper flakes and oregano. Drizzle top with oil.


Cover pot and bring to a boil. Reduce to a low simmer and keep covered and cook for about 10 minutes, stirring every 2 minutes or so. Cook until almost all liquid has evaporated – I left about an inch of liquid in the bottom of the pot – but you can reduce as desired .

Season to taste with salt and pepper , stirring pasta several times to distribute the liquid in the bottom of the pot. Serve garnished with Parmesan cheese.

Thursday, January 17, 2013

Alfredo Sauce

I made the most AWESOME alfredo sauce last week! I will never buy it in a jar EVER again! So, I found it off of Allrecipes. I wish I had printed it out so that I could give the person who posted it credit but I didn't and I am honestly too lazy to go back and look it up. So here it is! We ate it with chicken, broccoli and egg noodles. It was great and EVERYONE wanted more and I honestly horded the rest and didn't give anyone left overs. It honestly put the Olive Garden to shame and I really love their alfredo.

Ingredients

1/2 cup butter
1 pkg. cream cheese (1 brick)
2 tsp garlic powder (I used garlic salt since I didn't have any powder)
2 cups milk
6oz grated Parmesan cheese
1/8 tsp pepper

Directions

  1. Melt butter and cream cheese in sauce pan. Add garlic salt.
  2. Slowly add milk.
  3. Add Parmesan cheese and pepper.
  4. Heat to a boil and let simmer, making sure it does not scortch. A whisk works great to keep it moving so that the cheese will melt.
  5. Remove from heat, let sit for 2-3 minutes.
  6. Add to your favorite noodles!

Saturday, January 12, 2013

Meatballs

I've always wanted to try and make some meatballs and even more since Abbie is always asking for spaghetti and meatballs. So, we'll soon give this recipe a whirl!

Ingredients:

2 pounds ground beef (I use turkey)
1 small onion diced
1/4 dry breadcrumbs or as needed
1/4 cup freshly grated Parmesan cheese
2 eggs slightly beaten
4 cloves garlic minced
1 tablespoon dry oregano
1 tablespoon dried basil
1 teaspoon dried thyme
1 tablespoon Worcestershire sauce
1 teaspoon salt
1/2 teaspoon black ground pepper

Directions:
  1. Preheat oven to 425 degrees. Line a large baking sheet with parchment paper.
  2. Mix together the ground beef, onion, breadcrumbs, cheese, eggs, garlic, oregano, basil, thyme, Worcestershire sauce, salt and pepper in a large bowl until just combined.
  3. Divide the mixture into equal portions and then roll each of the portions into meatballs. Arrange the meatballs on the prepared baking sheet.
  4. Bake in the preheated oven until no longer pink in the center about 8-10 minutes.